
How Swagger Adjust can help you build extensible React+Redux apps
Written onStep by step guide to building React-Redux apps using pluggable architecture. Features are produced as plugins and are later composed to create the app. Plugins can be removed, added, or amended by other plugins.
More than four years ago, I worked on a backend project where I needed to render HTML documentation from OpenApi 2.0 JSON document defining our REST API written in hapi.js. The obvious choice was, of course, SwaggerUI. hapi.js ecosystem came with already implemented integrations for OpenApi 2.0 and SwaggerUI. We just needed to use them, and we did. It all worked like a charm. At that time, I successfully got out of the complex Angular 1.2/2 world and got into the simple and more predictable world of React+Redux. I figured out that SwaggerUI was built in React, so I navigated to its GitHub repo and read the code to learn how large-scale React apps are written. The code was different from the code I was used to writing. I built React applications using classical patterns like Presentational and Container Components (smart & dump components) and ducks pattern. It took me some time to understand that SwaggerUI was primarily built for extensibility in mind. Everything inside the code was revolves around this primary idea. The codebase was composed of several plugins. These plugins were either adding new behaviors to SwaggerUI or enhancing other behaviors defined in different plugins. There were almost no static imports involved because it had its own flavor of DI-container called System. Although the architecture looked interesting, it seemed overkill to use something like that in my current project.
In 2017, I was employed by a company called Apiary. I joined it a couple of months after the acquisition by Oracle, and my primary task was to architect and develop a new version of Apiary Documentation Renderer named: ApiaryUI. When I started to work on it, I remembered my study on SwaggerUI and its unique architecture. I built ApiaryUI around the same ideas of external extensibility. Of course, the code was completely different, but the architecture was very similar to SwaggerUI. The core of ApiaryUI was based on a DI-container called Kernel. I managed to finish the new ApiaryUI on time. Unfortunately, it has never been released as OpenSource due to different political and organizational reasons. Still, it’s been utilized by Apiary in its web app and used throughout various Oracle organizations.
Today I work for SmartBear, the company that’s behind SwaggerUI and the entire Swagger ecosystem. My primary focus in SmartBear is not on SwaggerUI, but from the moment I joined the company, I started to think about improving and modernizing its DI-container (System). I’ve been actually thinking about this for a long time. I started writing this article almost 3 years ago, when I decoupled its DI-container for the first time as I needed it for a small project with external extensibility requirements. Unfortunately, I never finished the article and never published the decoupled SwaggerUI DI-container as an OpenSource.
Swagger Adjust
But it’s all changing now. Let me introduce Swagger Adjust - a plugin-able framework for building extensible React+Redux applications. This framework was born by decoupling ideas of the plugin-able core of SwaggerUI into a separate reusable component. It allows you to produce React+Redux applications where every component, being a React Component, Redux state slice composed of actions, selector, reducers, or general business logic, is override-able and extensible.
Swagger Adjust is a wholly rewritten SwaggerUI’s DI-container (System) built on the Redux Toolkit. The name for the DI-container is the same as SwaggerUI’s – System. Generally, the API of Swagger Adjust is backward compatible with SwaggerUI. When I say “generally”, I mean it in a way that the default configuration of Swagger Adjust is incompatible with SwaggerUI but can be adapted by configuration to be fully compatible. Swagger Adjust is a free and Open Source software. It comes with a dual license – Apache License Version 2.0 is used for original code fragments, documentation fragments, and original ideas from SwaggerUI, and BSD 3-Clause License is used for everything else.
To demonstrate Swagger Adjust power, I’ve built a simple TodoList app composed of two plugins: todoList and todoListEnhancer. todoList plugin has the basic functionality of displaying a list of TodoItems and adding a new one. todoListEnhancer adds additional functionality like completion, deletion, and also batch operations on the entire TodoList.

todoList plugin looks like this when it renders. It contains AppBar, input for creating new todo items, and a list of already added todo items.
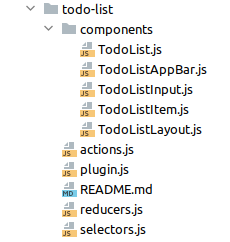
The only non-standard file is plugin.js. This file imports everything that todoPlugin consists of and exports a function returning an object with a specialized shape that our DI-container recognizes.
1
2
3
4
5
6
7
8
9
10
11
12
13
14
15
16
17
18
19
20
21
22
23
24
25
26
27
28
29
30
31
32
33
import TodoListLayout from './components/TodoListLayout';
import TodoListAppBar from './components/TodoListAppBar';
import TodoListInput from './components/TodoListInput';
import TodoList from './components/TodoList';
import TodoListItem from './components/TodoListItem';
import { addItem } from './actions';
import { selectTodoList, selectTodoListItems } from './selectors';
import reducers, { initialState } from './reducers';

const TodoListPlugin = () => {
  return {
    components: {
      TodoListLayout,
      TodoListAppBar,
      TodoListInput,
      TodoList,
      TodoListItem,
    },
    fn: {
      todoList: {},
    },
    statePlugins: {
      todoList: {
        initialState,
        actions: { addItem },
        selectors: { selectTodoList, selectTodoListItems },
        reducers,
      },
    },
  };
};

export default TodoListPlugin;
Now, this is where the real magic happens. Instead of using static imports in React components, we use specialized hooks to get everything we need from DI-container. For the TodoList component to correctly render, we need to select all todo items from the state and then use the TodoListItem component to render them.
1
2
3
4
5
6
7
8
9
10
11
12
13
14
15
16
17
18
19
20
21
22
23
24
25
26
27
28
29
30
31
import React from 'react';
import List from '@material-ui/core/List';
import Divider from '@material-ui/core/Divider';
import { makeStyles } from '@material-ui/core/styles';
import { useSystemComponent, useSystemSelector } from 'swagger-adjust';

const useStyles = makeStyles(() => ({
  root: {
    paddingTop: 0,
    paddingBottom: 0,
  },
}));

const TodoList = () => {
  const classes = useStyles();
  const items = useSystemSelector('todoList', 'selectTodoListItems');
  const TodoListItem = useSystemComponent('TodoListItem');

  return (
    <List className={classes.root}>
      {items.map((item) => (
        <React.Fragment key={item.id}>
          <TodoListItem item={item} />
          <Divider />
        </React.Fragment>
      ))}
    </List>
  );
};

export default TodoList;
DI-container has its own React Context called SystemContext, which accepts its instance. Tne first thing we do is – compose a list of plugins and pass it to the System class constructor (represents DI-container). DI-container automatically compiles the plugins under the hood and creates a store instance for us. Then we wrap our main App component into react-redux and SystemContext providers. This allows hooks mentioned above to access anything from the DI-container within React components.
1
2
3
4
5
6
7
8
9
10
11
12
13
14
15
16
17
18
19
20
21
/**
 * This component is just responsible to render the main TodoList component.
 * We need to this to allow other plugins to override TodoListLayout.
 */

const App = () => {
  const TodoListLayout = useSystemComponent('TodoListLayout');

  return <TodoListLayout />;
};

ReactDOM.render(
  <React.StrictMode>
    <Provider store={store}>
      <SystemContext.Provider value={system.getSystem}>
        <App />
      </SystemContext.Provider>
    </Provider>
  </React.StrictMode>,
  document.getElementById('root')
);
Let’s look into our second plugin – todoListEnhancer. As mentioned before, this plugin enhances the original todoList plugin and adds additional features. Enhancement doesn’t happen via todoList plugin code modification but rather by its configuration. And this is where Swagger Adjust really shines.
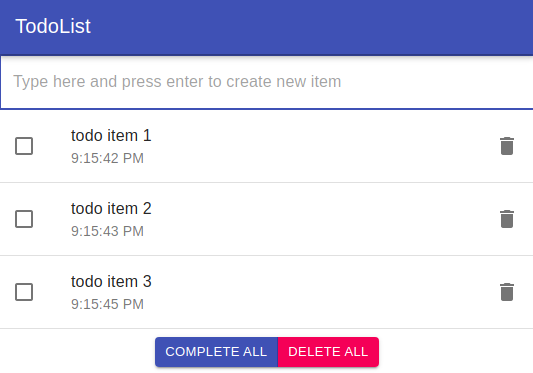
Every todo item in todoListEnhancer is now associated with creation time, the checkbox for completion, the bin icon for deletion, and at the bottom of TodoList, there are two buttons for batch operations.
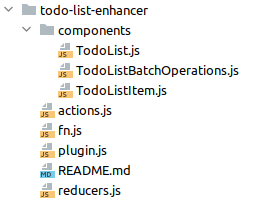
Here, we’re presented with todoListEnhancer directory structure and the source code of plugin.js. Again, please take a moment here and browse these files yourself to see the actual code. Inside plugin.js we’re replacing the TodoListItem component with the new one. We’re adding the new TodoListBatchOperations component and wrapping the TodoList component with a new one that composes the original TodoList component with TodoListBatchOperations. Additionally, we’re exposing the time formatting function to the plugin so that additional plugins could easily override how time is formatted.
1
2
3
4
5
6
7
8
9
10
11
12
13
14
15
16
17
18
19
20
21
22
23
24
25
26
27
28
29
30
31
32
33
34
35
36
37
38
39
40
41
42
43
44
import { assocPath } from 'ramda';

import { completeItem, uncompleteItem, deleteItem, completeAll, deleteAll } from './actions';
import { formatTimestamp } from './fn';
import reducers from './reducers';
import TodoList from './components/TodoList';
import TodoListItem from './components/TodoListItem';
import TodoListBatchOperations from './components/TodoListBatchOperations';

const TodoListEnhancerPlugin = (system) => {
  const todoListFn = assocPath(['formatTimestamp'], formatTimestamp, system.fn.todoList);

  return {
    components: {
      TodoListItem,
      TodoListBatchOperations,
    },
    wrapComponents: {
      TodoList,
    },
    fn: {
      todoList: todoListFn,
    },
    statePlugins: {
      todoList: {
        actions: {
          completeItem,
          uncompleteItem,
          deleteItem,
          completeAll,
          deleteAll,
        },
        wrapActions: {
          addItem: (oriAction) => (payload) => {
            oriAction({ ...payload, completed: false, createdAt: Date.now() });
          },
        },
        reducers,
      },
    },
  };
};

export default TodoListEnhancerPlugin;
The last thing we need to do is to register the todoListEnhancer plugin with the DI-Container.
1
2
3
const plugins = [TodoListPlugin, TodoListEnhancerPlugin];
const system = new System({ plugins });
const store = system.getStore();
When building React+Redux features in this architecture, one always has to think hard about exposing React components, Redux code, and other business or presentational logic to the plugin so that other plugins can easily enhance it. This also works in reverse – when building features that need to be “protected” from enhancements, instead use classical static ES6 imports, which prohibits anybody from enhancing your plugins.
Advanced usage patterns
During writing Swagger Adjust and using it on different projects, I’ve identified multiple advanced usage patterns that need to be mentioned. These advanced usage patterns include:
- various messaging patterns (Routing and Transformation) when wrapping actions
- providing initial state for a state plugin
- override reducers from another state plugin
- composing selectors in single state plugin
- composing selectors from different plugins
- registering and using hooks
Swagger Adjust consumers need to understand these usage patterns properly as they set conventions on how Swagger Adjust was designed to be used.
Word on conventions
Conventions are essential when producing any code. When utilized properly, it makes code produced by different people look like it was produced by a single person. Redux Toolkit has done a great job setting up conventions and standards for React+Redux applications. Swagger Adjust adopts all these conventions and adds a couple of its own:
- use createAction helper to create action creators
- use following convention for action type: “namespace/action”
- use createAsyncThunk to create async actions or handle side effects
- structure Files as Feature Folders as shown in this article
- name your selectors in the following naming scheme:
select<Name> - create memoized selectors using createSelector utility
Consult Redux Style Guide for additional conventions.
Closing words
Swagger Adjust it’s an ideal framework for creating User Interfaces (UI) with external extensibility requirement. It should work pretty well for creating renderers for different specifications like OpenApi, AsyncApi, or ApiBlueprint (as SwaggerUI demonstrated). It allows external extensibility via configuration and plugins, bringing much more features than demonstrated in this article. I welcome you to consult our documentation to learn more.
You can find all code demonstrated in this article in the Swagger Adjust GitHub repository.